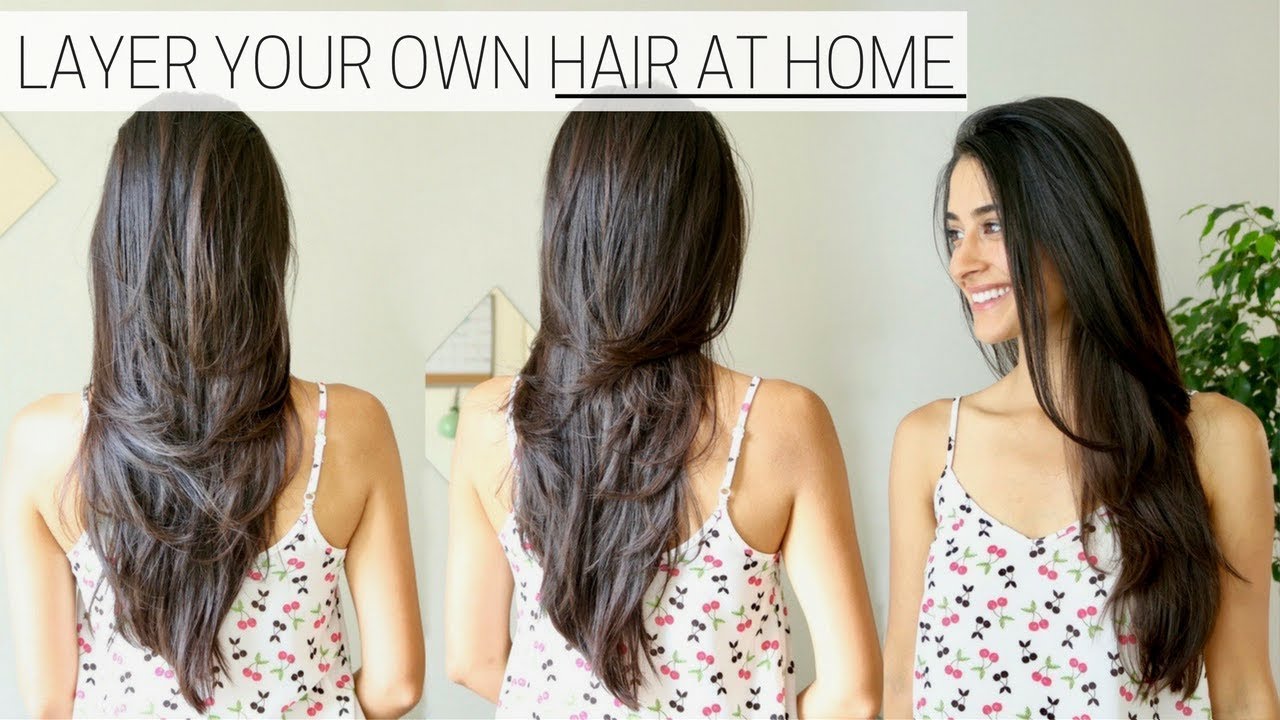
シャドーイング練習:HOW I CUT & LAYER MY HAIR AT HOME » diy long layers haircut
 フレーズを聞いてから、声に出してみましょう
フレーズ 1
全文スクリプト
- A few months ago, I shared with you a video on money -saving hacks, and in one of the tips I mentioned that I've been cutting my own hair for数ヶ月前にお金を節約する工夫について動画をシェアしたんですが、そのコツの一つで自分で髪を切ってるって言ったんですよ。0:00
- at least the last five years.少なくともこの5年間ずっと。0:05
- So in this video, I'm going to show you how I do that.だからこの動画では、私がどうやってるかをお見せしますね。0:07
- Now, I'll be completely honest.では、完全に正直に言います。0:12
- I hesitated a little bit when I came to making this video because I recognize that I am not a hairdresser, nor am I a hair expert.この動画を作るときに少し躊躇したんです。なぜなら、私は美容師でもないし、髪の専門家でもないからです。0:13
- But after I gave it some thought, I realized that Pickup Limes is about sharing with you simple and minimal ways of living.でも考えてみたら、Pickup Limesは皆さんとシンプルでミニマルな生活の工夫をシェアすることなんですよ。0:20
- So if I found something that works for me, then why not share that with you?だから、自分に合う方法を見つけたなら、皆さんにシェアしない理由はないじゃないですか。0:25
- But look, ultimately, it's your decision if you want to follow along or not.でも、結局のところ、やるかやらないかはあなた次第です。0:29
- But if this makes you feel nervous to cut your own hair, or maybe it's not even the cut that you're going for, then just disregard this video altogether.もし自分で髪を切ることに不安を感じたり、やろうとしてる髪型じゃなかったら、この動画は無視してもいいですよ。0:32
- But if you have been interested in cutting your own hair, giving it a trim or adding in some layers, then you might find this video helpful in some way.でも、自分で髪を切ったり、毛先を整えたり、レイヤーを入れることに興味があったら、この動画が役に立つかもしれません。0:39
- And just so you know, this is after I've cut my hair, how about I show you what it looked like before?ちなみに、ここはもう私が髪を切った後なんで、切る前はどんなだったか見せましょうか。0:46
- This is what the hair looked like curled, and it was just getting too long, feeling a little bit wild and way down on top of the head.これはカールした髪の毛の様子です。すごく長くなってて、ちょっと野生的な感じで、頭の上にずっと垂れ下がってました。0:50
157フレーズすべて表示 一部だけ表示
- And what you can see is the ends were a bit damaged and in desperate need of a trim.それに、毛先はちょっと傷んでて、本当にカットが必要な状態でした。0:56
- Here's what it looked like straightened just to give you a better indication as to how long it really was.ストレートにしたらこんな感じで、実際どのくらい長かったか分かりやすくなりますね。1:01
- So time to give it some more volume and get it looking a bit more healthy.だからボリュームを出して、もっと健康的に見えるようにしようってわけです。1:05
- Now to cut your own hair at home, you're just going to need four simple things, some hair elastics or hair clips, whichever you prefer.では自宅で髪を切るには、本当にシンプルな4つのものが必要なだけです。ヘアゴムかヘアクリップ、どちらでもいいです。1:09
- You're going to need some scissors.ハサミが必要です。1:14
- That one should go without saying.これは言わずもがなですね。1:15
- You're going to need some kind of brush as well as some kind of comb.ブラシとくし、両方が必要です。1:17
- I like to use both personally.私は両方使うのが好きです。1:19
- And that's really it.これだけです。1:21
- Now you can choose to cut your hair dry, in which case I definitely recommend that you straighten it so your hair is all the same length.髪が乾いた状態で切ることもできます。その場合は、髪全体が同じ長さになるようにストレートにすることをお勧めします。1:22
- Or you can choose to cut it wet as you'll see I've chosen to do.または、私がやってるみたいに、濡れた状態で切ることもできます。1:29
- And in that case, you're going to need just one extra thing, like this little handy spray bottle to make sure that your hair stays wet throughout the time whenその場合、髪がずっと濡れたままになるように、こういった便利なスプレーボトルという1つ追加のものが必要になります。1:32
- you're cutting it.切ってる間。1:39
- All right, so step number one is determining the length.では、ステップ1は長さを決めることです。1:39
- I start by dividing and separating the top two thirds of my hair into a bun.まず、髪の上の3分の2をお団子に束ねて分けます。1:42
- And I begin by cutting off the desired amount from the bottom third of my hair.そして、下の3分の1の髪から欲しい長さを切り始めます。1:46
- To do this, I just brought this hair to the front and separated it into two parts.これをするために、髪を前に持ってきて、2つに分けました。1:50
- Starting with the bottom piece, I run my hair through the comb, brushing it forward on a bit of an angle, and then cut to my determined length.下の部分から始めて、くしで髪をとかして、少し斜めに前に流しながら、決めた長さで切ります。1:54
- So cut straight across with the scissors and then point cut.つまり、ハサミで真っすぐ横に切って、それからポイントカットします。2:02
- Point cut just means cutting into the hair like I'll be doing here.ポイントカットというのは、こんな感じで髪の中に切り込みを入れることです。2:05
- It gives the hair some more texture and it helps the layers bleed together a little bit more.そうすると髪がテクスチャーが出て、レイヤーが自然になじみやすくなります。2:08
- Now we take this piece and use it as a guide by combining it with the other section.では、この部分をガイドとして使って、もう一つのセクションと合わせます。2:15
- So combing it all forward as we did before, holding the hair firmly between our fingers, and then looking for the guide, which is the shorter part that we justだから、さっきのように全部前にとかして、指で髪をしっかり持ちながら、ガイドを探します。ガイドというのは、さっき切った短い部分ですね。2:19
- cut.切った部分。2:26
- Then cut to the guide, but be careful not to cut the guide itself.では、ガイドに合わせて切りますが、ガイド自体は切らないように注意です。2:27
- You can also choose to point cut into the hair if you like, but you'll see I skipped it in this step because we're going to come back to cuttingポイントカットすることもできますが、このステップでは省きました。後で髪の前をカットするので。2:31
- the front of the hair at the end of the video.動画の最後で髪の前をカットします。2:36
- But go ahead and point cut now if it gives you peace of mind.でも、気が済むなら今ポイントカットしてもいいですよ。2:38
- So now you can see that when we cut the hair in this way, it already adds a bit of layers.この方法で髪を切ると、もうレイヤーが少し入るのが分かりますね。2:42
- The front pieces are shorter and what's going to fall into the back is longer.前の部分は短くて、後ろに落ちる部分は長いです。2:46
- It's been about six months since I've cut my hair, so you see I've gone ahead and cut off a fair bit, but if it's your first time, start by髪を切ってから6ヶ月くらいたってるので、かなり切り落としてますね。でも初めての人は。2:51
- trimming modestly.控えめに毛先を整えてください。2:57
- You can always cut off more the next time you do it if you ended up liking the results.結果が気に入ったら、次にもっと切ることもできます。2:58
- And also keep in mind if you're cutting your hair wet, it gets even shorter when it's dry.それと、濡れた状態で髪を切ると、乾くともっと短くなるってことも忘れずに。3:02
- So cutting off less might be a better idea, especially if it's your first time.だから特に最初のうちは、あんまり切らない方がいいかもしれません。3:07
- After you're finished cutting on the other side, it's always a good idea to double check that the lengths are the same on both sides.反対側の切り終わったら、両側の長さが同じか確認するといいですね。3:11
- And in this case, they are, so we're good.この場合は同じなので、大丈夫です。3:16
- Now I just repeat as I did before, finding the guide and cutting to that length, cutting across at first, and then point cutting.では、さっきのようにもう一度、ガイドを見つけて、その長さで切って、最初は真っすぐ横に、それからポイントカットします。3:18
- From the back, you'll see that this style of cut naturally gets longer as it approaches the spine.後ろから見ると、このカットスタイルは背骨に近づくにつれて自然に長くなるのが分かります。3:27
- And I feel the style of cut suits me much better than when the hair is cut in a blunt straight line across the back.そして、このカットスタイルは後ろが一本線でぶつっと切られてるより、私に合ってると思います。3:32
- Now I'm going to tie away this part and get started on adding the layers.では、この部分をしばって、レイヤーを入れ始めます。3:38
- For the layers, I'm going to bring down the top two thirds of my hair that I tucked away before, and I'll create a center part.レイヤーのために、さっきしばった上の3分の2の髪を下ろして、センターパートを作ります。3:42
- You'll want to create a center part regardless of how you part your hair naturally when it's styled.スタイリングしたときに自然にどう分け目ができるかは関係なく、センターパートを作りたいですね。3:48
- Then using my comb, I took a one centimeter section to the right of the center part and flipped it over to the opposite side of my head and tiedでは、くしを使って、センターパートの右側から1センチのセクションを取って、頭の反対側に流して、しばります。3:52
- away all of the hair on the right side of my head.頭の右側の髪全部をしばります。3:59
- We're going to come back to this later.これは後で戻ってきます。4:01
- Now using the comb, I neatly created a two centimeter section on the top of my head, about one centimeter to the left and one centimeter to the right ofでは、くしを使って、頭の上に2センチのセクションを作ります。センターパートの左側に1センチ、右側に1センチ。4:07
- the center part.センターパート。4:15
- Now it doesn't need to be exact, more or less is fine.今はそこまで正確である必要はなく、おおよそで大丈夫です。4:16
- Now this is the section we're going to use to determine the length of our shortest layer.では、この部分が最短レイヤーの長さを決めるために使う部分です。4:19
- So I begin by combing the hair straight up, holding the hair firmly between my pointer finger and middle finger.では、人差し指と中指でしっかり髪を挟み、髪をまっすぐ上にコーミングしていきます。4:23
- You just want to make sure that your fingers that are clamping the hair are parallel to the floor.髪を挟んでいる指が床と平行になっていることを確認してください。4:29
- Now keeping that tension between the fingers, you can bring the hair down so that you can see it and cut it straight across.その状態で張力を保ちながら、髪を下ろして見やすくしてから真っすぐ切ります。4:33
- Blunt cut first and then point cut in.まず直線的に切り、その後ポイントカットを入れます。4:40
- How much you choose to cut off is entirely up to you, keeping in mind this is going to be the shortest visible layer.どのくらい切るかはあなた次第ですが、ここが最短レイヤーになることを念頭に置いてください。4:42
- You can see here this is as short as it's going to be for me and it's a length I'm happy with.ご覧のように、これが私の最短の長さで、自分が満足する長さです。4:48
- Now I'm going to move about half of this hair to the other side of my head because I don't need it anymore, but I want to keep about halfでは、この髪の約半分を頭の他の方へ移します。もう必要ないからですが、約半分は残しておきたいです。4:52
- of it to combine with the new section of hair because I'm going to use it as my guide.それを新しい髪のセクションと組み合わせるため、それをガイドとして使うつもりです。4:58
- Now that it's all been combined, we do the same thing, combing the hair all the way up, holding firmly between the fingers and applying tension, keeping the fingers parallelすべて組み合わせたら、同じことをします。髪をまっすぐ上にコーミングし、指でしっかり挟んで張力をかけ、指を平行に保ちながら5:02
- to the floor and holding that tension between the fingers as you bring the hair down in front of your face to cut.床と平行に保ち、顔の前に髪を下ろして切ります。5:10
- You should be able to see very clearly the guide, which is the hair that we just cut in the previous step.前のステップで切った髪(ガイド)がはっきり見えるはずです。5:16
- We want to cut to the guide without cutting the guide itself and I usually actually blunt cut about half a centimeter or so below the guide and then goガイドを切らずにガイドまで切りたいのですが、通常は約0.5cm下を直線的に切ります。5:21
- in point cutting after this and that's pretty much all there is to it.その後ポイントカットを入れます。これが基本です。5:29
- At this point it's going to get really simple because it's going to start to get really repetitive.ここからは非常にシンプルになります。繰り返すだけだからです。5:32
- Section away some of the hair you've just cut to the other side of your head so it's out of the way, but keep some of that hair to combine切ったばかりの髪の一部を頭の反対側に移して邪魔にならないようにしますが、いくつか残しておいて組み合わせます5:37
- with the new section so it can be used as a guide.新しいセクションと一緒にしてガイドとして使えるようにします。5:43
- Combing up with tension, fingers parallel to the floor, cutting half a centimeter below the guide and then point cutting in.張力をかけてコーミングし、指を床と平行に保ち、ガイドの0.5cm下を切ってからポイントカットを入れます。5:45
- You might be wondering how layers are going to form if we keep cutting the hair to about the same height as we're doing here.ここで同じ高さで切り続けるとレイヤーがどう形成されるのか、疑問に思うかもしれません。5:52
- Keep in mind the head is curved so layers will naturally form at different heights when we allow the hair to fall after we've cut it.頭は丸いので、切った後に髪が落ちるとき、自然と異なる高さでレイヤーが形成されます。5:57
- When everything has been cut you can bring the hair back to its original place and I just sprayed it here to give it a brush to show you howすべてカットが終わったら、髪を元の位置に戻して、スプレーをしてブラッシングして見てみましょう。6:04
- the layers turned out.レイヤーの出来上がりです。6:10
- So as you can see shorter layer on the top and longer layers on the bottom, of course.ご覧のように、上は短いレイヤー、下は長いレイヤーです。6:11
- No extreme layers, just a modest amount to give it some texture and volume.極端なレイヤーではなく、テクスチャーとボリュームを出すための控えめな量です。6:16
- Now we're going to move on to the opposite side of the head but be sure to first separate a one centimeter portion to use as a guide before tyingでは反対側に進みますが、まず1cm幅のガイドとして使う部分を分けておいてから結びます6:20
- all of this hair away.すべての髪をまとめて。6:27
- Then you can let down the hair that needs to be cut and it likely also needs to be sprayed and combed through to make sure it's evenly wet.次に、カットが必要な髪を下ろし、スプレーをしてコーミングして、均等に濡れていることを確認します。6:29
- Now I've sped up this part of the video because we do exactly what we did on the other side here.ここからは早送りにしていますが、反対側と同じことをするからです。6:37
- Taking a new piece of hair and combining it with a previously cut portion, combing up, finding the guide as you can see here which is the piece we just新しい髪を取り、前に切った部分と組み合わせ、コーミングしてガイドを探します。ここで見えるのは、さっき6:41
- transferred over from the other side and then we cut just below the guide and then start point cutting in.反対側から移した部分で、ガイドの下を切ってからポイントカットを始めます。6:49
- I think you're getting the idea.要領は分かってきたと思います。6:54
- It starts to look like I'm cutting off a lot of hair and I'm sure it looks really daunting or scary but I assure you I've kept much of myたくさん髪を切っているように見えて、怖く感じるかもしれませんが、私は多くの髪を残していることを保証します。7:00
- length and you'll see that for yourself at the end of the video.それを自分の目で確認できますよ。ビデオの最後で。7:07
- Granted it has been six months since I cut my hair last so I cut off more than I would if I was cutting every three or so months.確かに、最後にカットしてから6か月経っているので、3か月ごとにカットするより多く切っています。7:09
- Ultimately though cut off as much as makes you feel comfortable and if it's your first time cut less and see how you like the results.結局のところ、快適に感じる量だけ切ってください。初めての場合は少なく切って、結果を見てみてください。7:15
- If you like how it turned out cut more the next time.結果が気に入ったら、次はもっと切ります。7:22
- Now especially in this last part you can see it starts to look like I'm cutting off a lot of hair but trust me it looks really good in the特にこの最後の部分では、たくさん切っているように見えますが、信じてください。最後には7:27
- end and all the layers come together really nicely.本当に良く仕上がって、すべてのレイヤーが上手くまとまります。7:33
- Alright so now both sides have been cut and layered and we're almost done.では両側がカットされてレイヤーが入り、もうすぐ完成です。7:39
- The only thing left is to frame the hair around the face so go ahead and recreate the center part.残るのは顔の周りの髪をフレーミングすることだけなので、センターパートを作り直してください。7:42
- You can also remove all of the hair elastics we use to tie back the hair and spray the hair if needed to make sure it's all sufficiently wet.髪を結ぶのに使ったヘアゴムをすべて取り外し、必要に応じてスプレーして、十分に濡れていることを確認してください。7:47
- You can see the hair is already layered at the front of the face but I like the layers to be a bit more noticeable and clean cut so all顔の前の髪にはすでにレイヤーが入っていますが、もっとはっきりしたきれいなレイヤーにしたいので7:54
- we want to do is take the comb and draw a line from the center part down to the top of the ear and we do this on both sidesコームを取り、センターパートから耳の上まで線を引きます。両側で。8:00
- of the head.頭の両側で。8:06
- Then we tie away the hair in the back so that we can focus just on the hair that frames the face.次に、背中の髪をまとめて、顔の周りの髪だけに集中できるようにします。8:06
- Wet it if needed and then start to comb the hair down and on an angle holding the hair firmly between the fingers.必要に応じて濡らし、指でしっかり挟んで、髪を下に斜めにコーミングし始めます。8:11
- You might need to do this a few times and take your time making sure you've got the hair held firmly because we're working with the front of the face何度かやる必要があるかもしれません。髪をしっかり挟んでいることを確認するのに時間をかけてください。顔の前を8:18
- after all.扱っているからです。8:24
- This is not a section we want to mess up.ここはミスしたくない部分です。8:25
- When the hair is evenly distributed between your fingers you can begin to cut just a little bit off the length about a centimeter or so.髪が指の間に均等に分布したら、長さの約1cm程度を少し切ります。8:27
- Point cutting in with the scissors as you work your way down the hair on an angle.髪を斜めに下へ進みながら、ハサミでポイントカットを入れていきます。8:34
- So now that it's done you can see that the layers are a little bit more pronounced and I usually like to go over this part one more time toこれで完了すると、レイヤーがもう少しはっきり見えます。通常、この部分をもう一度確認して8:38
- make sure it's looking neatly cut on an angle cutting away any little stray bits as needed.きれいに斜めに切られているか確認し、はみ出した部分を切り落とします。8:44
- Then we repeat this on the other side.では反対側でも同じことをします。8:49
- Because I'm right -handed with the scissors and it's easier for me to see what I'm doing on this side of my head you'll see that I cut the hair右利きでハサミを持ちやすく、この側の方が見やすいので、髪を8:51
- from the bottom up whereas on the other side of the head I was cutting from the top down but really it doesn't matter in which direction you do it下から上へ切ります。一方、反対側では上から下へ切りましたが、実は方向は8:57
- so long as you're cutting off the same amount from both sides.両側から同じ量を切っていれば問題ありません。9:04
- As you can see I always do a check anyway to see if the layers are the same length on both sides of the face and after doing this Iご覧のように、常に両側の顔のレイヤーが同じ長さかチェックします。やってみた結果9:07
- noticed I needed to cut off a little bit more so that's what I'm doing now.もう少し切る必要があることに気付きました。それで今、切っているところです。9:13
- And checking this one more time I see that the layers ended up being the same length on both sides so I'm happy with it.もう一度確認してみると、レイヤーが両側で同じ長さになっているのが分かるので、とても満足しています。9:21
- Now you can let down all of your hair and I've just given it a spray and a brush to show you what the final layers look like when theでは髪全体を下ろしていただいて、スプレーとブラシをかけて、最終的なレイヤーがどのように見えるかをお見せします9:27
- hair is still wet before we begin styling.スタイリングを始める前に、髪がまだ湿った状態での見た目です。9:33
- So you can see the layers are not extreme but they are definitely more visible and the hair has overall maintained its length so even though it may have lookedご覧のようにレイヤーは極端ではありませんが、確かに目立つようになり、髪全体の長さは保たれているので、たくさん切ったように見えましたが9:36
- like we were cutting off a lot in the end it still looks long and healthy.結果的にはまだ長く、健康的に見えます。9:43
- Now that the cut is finished you can go ahead and part it however you normally would.カットが終わったので、いつもどおりに髪を分けてください。9:48
- I usually part it on a little bit of an angle on one side of my head which naturally gives one side more layers than the other.私は通常、頭の片側に少し角度をつけて分けるので、自然に片側のほうがレイヤーが多くなります。9:52
- Then the most important step is to dry and style your hair however you normally would so that you can see how the final result looks.そして最も大切なステップは、いつもどおりに髪を乾かしてスタイリングすることで、最終的な仕上がりがどのように見えるかが分かります。9:58
- I'm always so happy with it and even after five years I'm still dumbfounded with how easy it is to cut my own hair at home.いつもとても満足していて、5年経った今でも、自宅で自分の髪を切るのがこんなに簡単なことに驚き続けています。10:05
- So now that I've finished styling my hair you can see that the layers framing the face look really cute and give it a lot of volume.スタイリングを終えた今、顔周りのレイヤーが本当にかわいく見えて、ボリュームがたくさん出ているのが分かります。10:12
- Now a lot of you ask me what products I use in my hair and the answer is simple.髪に使っている製品が何かとよく聞かれますが、答えは簡単です。10:17
- I don't use any products.何も使っていません。10:21
- I'm lucky to have a hair type that holds its style so I don't need any mousse or hair spray or anything like that.スタイルをキープできる髪質に恵まれているので、ムースやヘアスプレーは必要ありません。10:23
- The only thing I do use is a little tiny tiny bit of coconut oil just to defrizz the hair and of course it naturally adds a little bit of使っている唯一のものは、髪のうねりを取るためのほんの少しのココナッツオイルで、もちろん少しの10:29
- shine too.艶も出ます。10:37
- But I mean it when I say just a tiny bit.でも本当に少しのことですから。10:38
- It goes a long way and you don't want your hair to be oily.少量でも効果があり、髪がべたべたになるのは避けたいですから。10:40
- Now let me show you the back.では後ろを見せます。10:43
- You can see that the hair looks healthy.髪が健康的に見えるのが分かります。10:45
- It tapers really nicely towards the center and the layers make the hair look luscious and add plenty of volume as well.中心に向かって本当にきれいに細くなり、レイヤーが髪を豊かに見せて、たくさんボリュームを出しています。10:46
- Seriously could this have been any easier?本当にこれ以上簡単なことがあるでしょうか?10:53
- I thought I'd also show you the hair when it's been straightened so you can better see how the layers look.ストレートにした時の髪もお見せしようと思いました。レイヤーがどのように見えるかがよく分かります。10:55
- You can see now there's a lot of texture and the shortest layer is about shoulder length on me but you can always make the layers more or less extremeご覧のようにテクスチャーがたくさんあり、一番短いレイヤーは私の肩くらいの長さですが、いつでもレイヤーをもっと極端に11:00
- depending on how you like it.したり、控えめにしたりできます。あなたの好みに合わせて。11:07
- Curly, wavy or straightened the layers look visible and beautiful either way.カール、ウェーブ、ストレートのどれでも、レイヤーは見えて、どちらにせよ美しく見えます。11:09
- Alright so now you know how I cut my own hair at home and how I've been doing it for the last five years.さて、私が自宅で髪を切る方法と、この5年間ずっとこのようにしてきたことをご理解いただけたと思います。11:14
- It might go without saying I'm always so pleased with the results or else I wouldn't be doing it time and time again.言うまでもなく、私はいつも結果に満足しているから何度も何度も繰り返してやっているのです。11:18
- I love how light it feels afterwards.その後のかるい感じが大好きです。11:23
- Above all else I love how healthy it feels especially with all the little dead ends trimmed away and gone so I like to keep up with it every three何より、細い枝毛が全部切り落とされて、健康的に感じるのが大好きなので、3ヶ月ごとに11:25
- or four months by giving it a little trim but of course now you are at the liberty of cutting it however often you'd like.軽くトリミングするようにしていますが、もちろん今はあなた自身で好きなだけ切ることができます。11:32
- That's one of the perks of being able to do it yourself at home and I'm going to emphasize this one last time for good measure.それが自宅でセルフカットできることの利点の一つで、最後にもう一度強調しておきます。11:39
- If it's your first time cutting your own hair please cut it modestly at first so trim away just a little bit.初めて自分で髪を切るのであれば、最初は控えめに、ほんの少しだけ切ってください。11:44
- Wait for the results see if you like it.結果を待って、気に入ったかどうか確認してください。11:50
- If you do the next time you cut it you can always cut away a little bit more if you'd like.気に入ったら、次に切る時にもっと切ることができます。11:52
- Okay that's it for today guys.では今日はこれで終わりです。11:55
- Thanks love for watching and I will see you next week.見てくださってありがとうございました。来週もお楽しみに。11:57
- Ciao!チャオ!12:00
このクリップの計測値
- 話速
- 1分あたり275語 — カタログの98%より速い
- CEFRレベル
- B1
- 覚えておきたい単語
- clamping, dumbfounded, styled, modestly, layered, centimeter