Shadowing practice: HOW I CUT & LAYER MY HAIR AT HOME » diy long layers haircut
 Listen to the line, then say it out loud
Full transcript
- A few months ago, I shared with you a video on money -saving hacks, and in one of the tips I mentioned that I've been cutting my own hair for0:00
- at least the last five years.0:05
- So in this video, I'm going to show you how I do that.0:07
- Now, I'll be completely honest.0:12
- I hesitated a little bit when I came to making this video because I recognize that I am not a hairdresser, nor am I a hair expert.0:13
- But after I gave it some thought, I realized that Pickup Limes is about sharing with you simple and minimal ways of living.0:20
- So if I found something that works for me, then why not share that with you?0:25
- But look, ultimately, it's your decision if you want to follow along or not.0:29
- But if this makes you feel nervous to cut your own hair, or maybe it's not even the cut that you're going for, then just disregard this video altogether.0:32
- But if you have been interested in cutting your own hair, giving it a trim or adding in some layers, then you might find this video helpful in some way.0:39
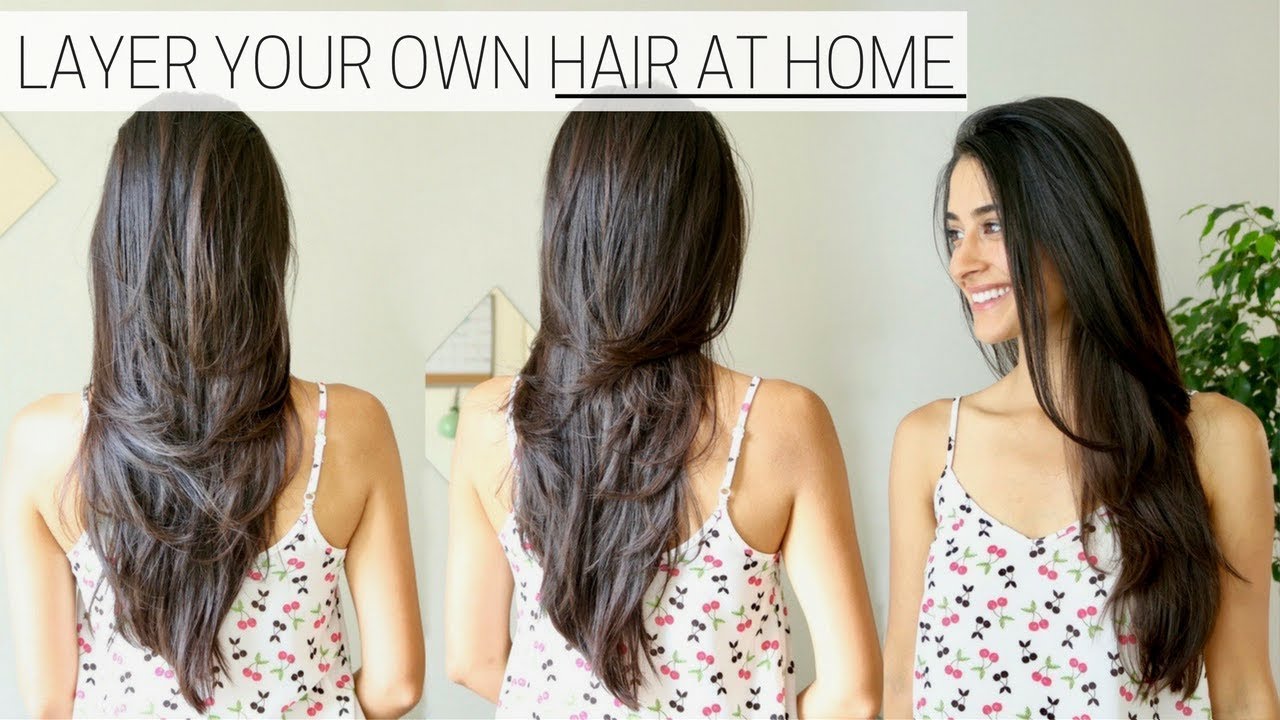
- And just so you know, this is after I've cut my hair, how about I show you what it looked like before?0:46
- This is what the hair looked like curled, and it was just getting too long, feeling a little bit wild and way down on top of the head.0:50
Show all 157 lines Show fewer lines
- And what you can see is the ends were a bit damaged and in desperate need of a trim.0:56
- Here's what it looked like straightened just to give you a better indication as to how long it really was.1:01
- So time to give it some more volume and get it looking a bit more healthy.1:05
- Now to cut your own hair at home, you're just going to need four simple things, some hair elastics or hair clips, whichever you prefer.1:09
- You're going to need some scissors.1:14
- That one should go without saying.1:15
- You're going to need some kind of brush as well as some kind of comb.1:17
- I like to use both personally.1:19
- And that's really it.1:21
- Now you can choose to cut your hair dry, in which case I definitely recommend that you straighten it so your hair is all the same length.1:22
- Or you can choose to cut it wet as you'll see I've chosen to do.1:29
- And in that case, you're going to need just one extra thing, like this little handy spray bottle to make sure that your hair stays wet throughout the time when1:32
- you're cutting it.1:39
- All right, so step number one is determining the length.1:39
- I start by dividing and separating the top two thirds of my hair into a bun.1:42
- And I begin by cutting off the desired amount from the bottom third of my hair.1:46
- To do this, I just brought this hair to the front and separated it into two parts.1:50
- Starting with the bottom piece, I run my hair through the comb, brushing it forward on a bit of an angle, and then cut to my determined length.1:54
- So cut straight across with the scissors and then point cut.2:02
- Point cut just means cutting into the hair like I'll be doing here.2:05
- It gives the hair some more texture and it helps the layers bleed together a little bit more.2:08
- Now we take this piece and use it as a guide by combining it with the other section.2:15
- So combing it all forward as we did before, holding the hair firmly between our fingers, and then looking for the guide, which is the shorter part that we just2:19
- cut.2:26
- Then cut to the guide, but be careful not to cut the guide itself.2:27
- You can also choose to point cut into the hair if you like, but you'll see I skipped it in this step because we're going to come back to cutting2:31
- the front of the hair at the end of the video.2:36
- But go ahead and point cut now if it gives you peace of mind.2:38
- So now you can see that when we cut the hair in this way, it already adds a bit of layers.2:42
- The front pieces are shorter and what's going to fall into the back is longer.2:46
- It's been about six months since I've cut my hair, so you see I've gone ahead and cut off a fair bit, but if it's your first time, start by2:51
- trimming modestly.2:57
- You can always cut off more the next time you do it if you ended up liking the results.2:58
- And also keep in mind if you're cutting your hair wet, it gets even shorter when it's dry.3:02
- So cutting off less might be a better idea, especially if it's your first time.3:07
- After you're finished cutting on the other side, it's always a good idea to double check that the lengths are the same on both sides.3:11
- And in this case, they are, so we're good.3:16
- Now I just repeat as I did before, finding the guide and cutting to that length, cutting across at first, and then point cutting.3:18
- From the back, you'll see that this style of cut naturally gets longer as it approaches the spine.3:27
- And I feel the style of cut suits me much better than when the hair is cut in a blunt straight line across the back.3:32
- Now I'm going to tie away this part and get started on adding the layers.3:38
- For the layers, I'm going to bring down the top two thirds of my hair that I tucked away before, and I'll create a center part.3:42
- You'll want to create a center part regardless of how you part your hair naturally when it's styled.3:48
- Then using my comb, I took a one centimeter section to the right of the center part and flipped it over to the opposite side of my head and tied3:52
- away all of the hair on the right side of my head.3:59
- We're going to come back to this later.4:01
- Now using the comb, I neatly created a two centimeter section on the top of my head, about one centimeter to the left and one centimeter to the right of4:07
- the center part.4:15
- Now it doesn't need to be exact, more or less is fine.4:16
- Now this is the section we're going to use to determine the length of our shortest layer.4:19
- So I begin by combing the hair straight up, holding the hair firmly between my pointer finger and middle finger.4:23
- You just want to make sure that your fingers that are clamping the hair are parallel to the floor.4:29
- Now keeping that tension between the fingers, you can bring the hair down so that you can see it and cut it straight across.4:33
- Blunt cut first and then point cut in.4:40
- How much you choose to cut off is entirely up to you, keeping in mind this is going to be the shortest visible layer.4:42
- You can see here this is as short as it's going to be for me and it's a length I'm happy with.4:48
- Now I'm going to move about half of this hair to the other side of my head because I don't need it anymore, but I want to keep about half4:52
- of it to combine with the new section of hair because I'm going to use it as my guide.4:58
- Now that it's all been combined, we do the same thing, combing the hair all the way up, holding firmly between the fingers and applying tension, keeping the fingers parallel5:02
- to the floor and holding that tension between the fingers as you bring the hair down in front of your face to cut.5:10
- You should be able to see very clearly the guide, which is the hair that we just cut in the previous step.5:16
- We want to cut to the guide without cutting the guide itself and I usually actually blunt cut about half a centimeter or so below the guide and then go5:21
- in point cutting after this and that's pretty much all there is to it.5:29
- At this point it's going to get really simple because it's going to start to get really repetitive.5:32
- Section away some of the hair you've just cut to the other side of your head so it's out of the way, but keep some of that hair to combine5:37
- with the new section so it can be used as a guide.5:43
- Combing up with tension, fingers parallel to the floor, cutting half a centimeter below the guide and then point cutting in.5:45
- You might be wondering how layers are going to form if we keep cutting the hair to about the same height as we're doing here.5:52
- Keep in mind the head is curved so layers will naturally form at different heights when we allow the hair to fall after we've cut it.5:57
- When everything has been cut you can bring the hair back to its original place and I just sprayed it here to give it a brush to show you how6:04
- the layers turned out.6:10
- So as you can see shorter layer on the top and longer layers on the bottom, of course.6:11
- No extreme layers, just a modest amount to give it some texture and volume.6:16
- Now we're going to move on to the opposite side of the head but be sure to first separate a one centimeter portion to use as a guide before tying6:20
- all of this hair away.6:27
- Then you can let down the hair that needs to be cut and it likely also needs to be sprayed and combed through to make sure it's evenly wet.6:29
- Now I've sped up this part of the video because we do exactly what we did on the other side here.6:37
- Taking a new piece of hair and combining it with a previously cut portion, combing up, finding the guide as you can see here which is the piece we just6:41
- transferred over from the other side and then we cut just below the guide and then start point cutting in.6:49
- I think you're getting the idea.6:54
- It starts to look like I'm cutting off a lot of hair and I'm sure it looks really daunting or scary but I assure you I've kept much of my7:00
- length and you'll see that for yourself at the end of the video.7:07
- Granted it has been six months since I cut my hair last so I cut off more than I would if I was cutting every three or so months.7:09
- Ultimately though cut off as much as makes you feel comfortable and if it's your first time cut less and see how you like the results.7:15
- If you like how it turned out cut more the next time.7:22
- Now especially in this last part you can see it starts to look like I'm cutting off a lot of hair but trust me it looks really good in the7:27
- end and all the layers come together really nicely.7:33
- Alright so now both sides have been cut and layered and we're almost done.7:39
- The only thing left is to frame the hair around the face so go ahead and recreate the center part.7:42
- You can also remove all of the hair elastics we use to tie back the hair and spray the hair if needed to make sure it's all sufficiently wet.7:47
- You can see the hair is already layered at the front of the face but I like the layers to be a bit more noticeable and clean cut so all7:54
- we want to do is take the comb and draw a line from the center part down to the top of the ear and we do this on both sides8:00
- of the head.8:06
- Then we tie away the hair in the back so that we can focus just on the hair that frames the face.8:06
- Wet it if needed and then start to comb the hair down and on an angle holding the hair firmly between the fingers.8:11
- You might need to do this a few times and take your time making sure you've got the hair held firmly because we're working with the front of the face8:18
- after all.8:24
- This is not a section we want to mess up.8:25
- When the hair is evenly distributed between your fingers you can begin to cut just a little bit off the length about a centimeter or so.8:27
- Point cutting in with the scissors as you work your way down the hair on an angle.8:34
- So now that it's done you can see that the layers are a little bit more pronounced and I usually like to go over this part one more time to8:38
- make sure it's looking neatly cut on an angle cutting away any little stray bits as needed.8:44
- Then we repeat this on the other side.8:49
- Because I'm right -handed with the scissors and it's easier for me to see what I'm doing on this side of my head you'll see that I cut the hair8:51
- from the bottom up whereas on the other side of the head I was cutting from the top down but really it doesn't matter in which direction you do it8:57
- so long as you're cutting off the same amount from both sides.9:04
- As you can see I always do a check anyway to see if the layers are the same length on both sides of the face and after doing this I9:07
- noticed I needed to cut off a little bit more so that's what I'm doing now.9:13
- And checking this one more time I see that the layers ended up being the same length on both sides so I'm happy with it.9:21
- Now you can let down all of your hair and I've just given it a spray and a brush to show you what the final layers look like when the9:27
- hair is still wet before we begin styling.9:33
- So you can see the layers are not extreme but they are definitely more visible and the hair has overall maintained its length so even though it may have looked9:36
- like we were cutting off a lot in the end it still looks long and healthy.9:43
- Now that the cut is finished you can go ahead and part it however you normally would.9:48
- I usually part it on a little bit of an angle on one side of my head which naturally gives one side more layers than the other.9:52
- Then the most important step is to dry and style your hair however you normally would so that you can see how the final result looks.9:58
- I'm always so happy with it and even after five years I'm still dumbfounded with how easy it is to cut my own hair at home.10:05
- So now that I've finished styling my hair you can see that the layers framing the face look really cute and give it a lot of volume.10:12
- Now a lot of you ask me what products I use in my hair and the answer is simple.10:17
- I don't use any products.10:21
- I'm lucky to have a hair type that holds its style so I don't need any mousse or hair spray or anything like that.10:23
- The only thing I do use is a little tiny tiny bit of coconut oil just to defrizz the hair and of course it naturally adds a little bit of10:29
- shine too.10:37
- But I mean it when I say just a tiny bit.10:38
- It goes a long way and you don't want your hair to be oily.10:40
- Now let me show you the back.10:43
- You can see that the hair looks healthy.10:45
- It tapers really nicely towards the center and the layers make the hair look luscious and add plenty of volume as well.10:46
- Seriously could this have been any easier?10:53
- I thought I'd also show you the hair when it's been straightened so you can better see how the layers look.10:55
- You can see now there's a lot of texture and the shortest layer is about shoulder length on me but you can always make the layers more or less extreme11:00
- depending on how you like it.11:07
- Curly, wavy or straightened the layers look visible and beautiful either way.11:09
- Alright so now you know how I cut my own hair at home and how I've been doing it for the last five years.11:14
- It might go without saying I'm always so pleased with the results or else I wouldn't be doing it time and time again.11:18
- I love how light it feels afterwards.11:23
- Above all else I love how healthy it feels especially with all the little dead ends trimmed away and gone so I like to keep up with it every three11:25
- or four months by giving it a little trim but of course now you are at the liberty of cutting it however often you'd like.11:32
- That's one of the perks of being able to do it yourself at home and I'm going to emphasize this one last time for good measure.11:39
- If it's your first time cutting your own hair please cut it modestly at first so trim away just a little bit.11:44
- Wait for the results see if you like it.11:50
- If you do the next time you cut it you can always cut away a little bit more if you'd like.11:52
- Okay that's it for today guys.11:55
- Thanks love for watching and I will see you next week.11:57
- Ciao!12:00
A fast American monologue: this DIY haircut clip for english listening practice
One host talks straight to the camera about cutting her own hair at home. There is no interviewer and no second voice, just one American speaker walking through her reasoning and then her process from start to finish, useful for american accent training as well as english listening practice: no accents to reconcile, no overlapping turns, just one line of thought to follow.
The pace sits at 275 words per minute, faster than 98% of the catalogue, so this is not a clip to relax into on a first pass. The level is B1: personal, conversational sentences rather than technical ones, but you still have to keep up. Rare words the level rating flags, such as clamping, dumbfounded and trimming, belong to the haircut itself later on; the opening minutes quoted below are mostly hedging and reasoning.
How she hedges, lists and hooks you in the opening minute
Three lines from the opening carry the texture worth noticing before you get near the scissors.
- "I hesitated a little bit when I came to making this video because I recognize that I am not a hairdresser, nor am I a hair expert." The double hedge, hesitated then "not a hairdresser, nor am I a hair expert", is how a real speaker softens a claim instead of just stating it. Say the "nor am I" clause on its own until the rhythm feels natural.
- "But look, ultimately, it's your decision if you want to follow along or not." "But look" is a spoken discourse marker that resets the sentence, worth practising on its own before you attach the rest of the line.
- "You're going to need some kind of brush as well as some kind of comb." The repeated "some kind of" is how she lists tools without sounding like she is reading from a checklist; say the pattern out loud until "some kind of" stops feeling like two separate words.
How to shadow this line by line for english speaking practice
Work through the opening in order rather than jumping straight to the haircut itself; the reasoning lines set the pace you need for the rest of the video.
- Start at line one, the money saving hack aside, and read it once through slowly before you try matching the 275 words per minute pace.
- Shadow line five on its own, "I am not a hairdresser, nor am I a hair expert", isolating the hedge before you take on the whole sentence.
- Take line eight, "it's your decision if you want to follow along or not", and repeat it until "But look" stops sounding like two separate beats.
- Move to the before and after description in lines eleven to fourteen, where she describes the hair "curled" then "straightened"; practise switching between the two without slowing down.
- Finish the opening with the tool list in lines sixteen to twenty, saying "some hair elastics or hair clips, whichever you prefer" next to "some kind of brush as well as some kind of comb" back to back, since that repeated "some kind of" is the pattern worth owning before you watch her actually cut.